
easy, homemade, pumpkin, crisp — The Ultimate Comfort Dish for Cozy Evenings
easy, homemade, pumpkin, crisp combines heartiness, warmth, and nutrition in one delightful package. This comprehensive guide reveals how to make the perfect autumn and winter treat — comforting, wholesome, deeply flavorful, and crafted with chef-level technique and family-friendly ease. Whether you’re a seasoned baker or new to the kitchen, this step-by-step approach ensures a perfect pumpkin crisp every time, making it a staple for holiday gatherings, cozy nights in, or simply to satisfy a sweet craving with a touch of wholesome goodness.
Why easy, homemade, pumpkin, crisp Matters in Autumn and Winter
During cooler months, our bodies crave comfort and warmth, and our palates often lean towards flavors that evoke nostalgia and coziness. An easy, homemade, pumpkin, crisp delivers on all fronts. It’s more than just a dessert; it’s a celebration of seasonal produce, a comforting hug in a bowl, and a versatile dish that can be adapted to suit various dietary needs. Beyond its delicious taste, pumpkin is packed with essential nutrients, making this crisp a guilt-free indulgence.
The act of baking itself can be incredibly therapeutic, filling your home with inviting aromas that instantly lift spirits. Imagine the scent of cinnamon, nutmeg, and roasted pumpkin wafting from your oven, creating an atmosphere of warmth and hospitality. This crisp offers a perfect balance of creamy pumpkin filling and a crunchy, buttery topping, providing a delightful textural contrast that elevates the experience beyond a simple pie. It’s an accessible alternative for those who find pie crusts intimidating, offering all the beloved flavors with a simpler execution.
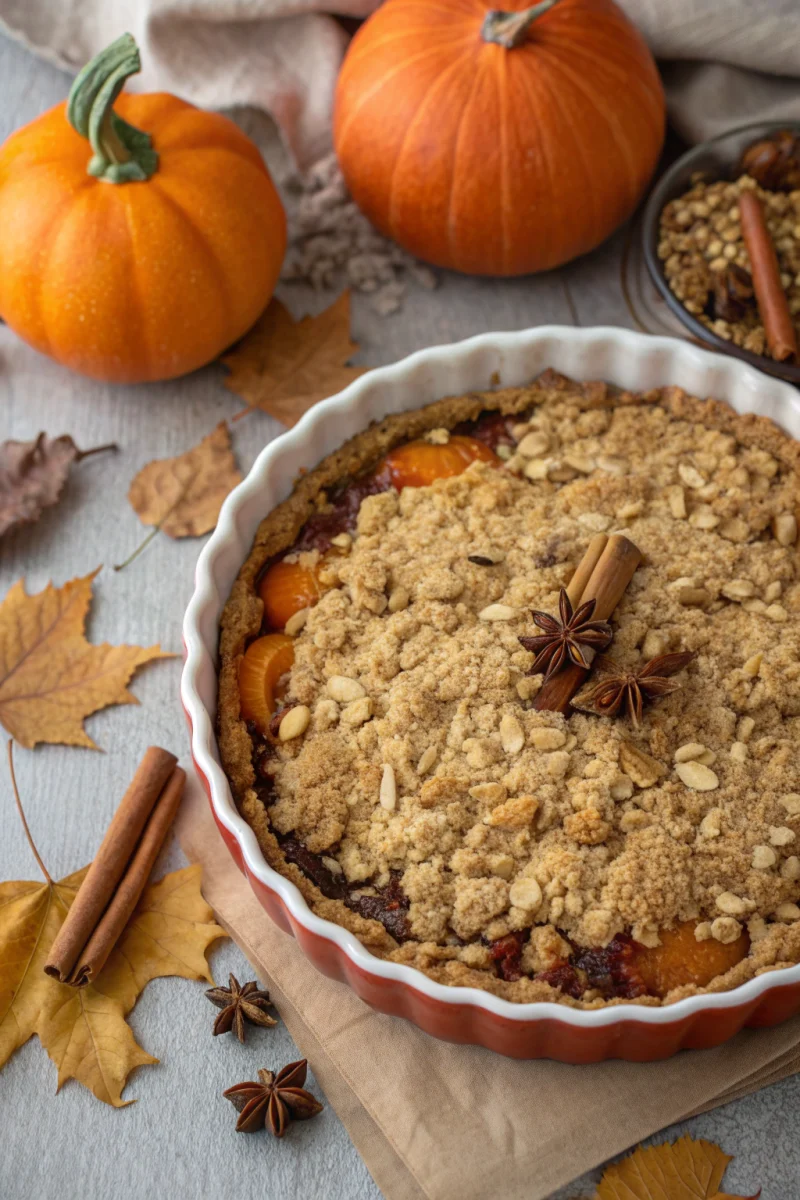
Core Ingredients for Your easy, homemade, pumpkin, crisp
Creating a truly exceptional easy, homemade, pumpkin, crisp starts with high-quality ingredients. Each component plays a vital role in achieving the perfect balance of flavor and texture. We’ll break them down into the pumpkin layer and the crisp topping.
For the Pumpkin Layer:
- 2 cups pumpkin puree: While canned puree is convenient, roasting and pureeing your own pumpkin (such as Sugar Pie, Hokkaido, or Kabocha) offers a richer, more nuanced flavor. Look for “100% pumpkin” puree if using canned, avoiding pie filling.
- 1/2 cup granulated sugar: Provides sweetness. Adjust to your desired level, or substitute with maple syrup or a sugar alternative for a different flavor profile.
- 1/4 cup brown sugar (packed): Adds a deeper, caramel-like sweetness and moisture.
- 1 cup evaporated milk: Contributes to the creamy texture and rich flavor without adding excessive liquid. Full-fat coconut milk can be a dairy-free alternative.
- 2 large eggs: Act as a binder, giving the pumpkin layer its smooth, custard-like consistency.
- 2 tsp pumpkin pie spice: A pre-mixed blend of cinnamon, ginger, nutmeg, and cloves. If you don’t have it, you can create your own (1 tsp cinnamon, 1/2 tsp ginger, 1/4 tsp nutmeg, 1/8 tsp cloves).
- 1/2 tsp salt: Essential for balancing the sweetness and enhancing all other flavors.
- 1 tsp vanilla extract: Adds a warm, aromatic depth that complements the spices beautifully.
For the Crisp Topping:
- 1 cup all-purpose flour: Forms the base of the crumble. Whole wheat flour or a gluten-free blend can be used for dietary modifications.
- 1/2 cup rolled oats (not instant): Adds texture, nuttiness, and a wholesome chewiness to the topping.
- 1/2 cup brown sugar (packed): Sweetens the topping and helps create that desirable crisp brown crust.
- 1/2 cup unsalted butter, cold and cubed: Crucial for a flaky, crumbly texture. Using cold butter prevents it from melting too quickly and helps create distinct crumbles.
- 1/2 tsp cinnamon: Enhances the spiced flavor profile.
- Pinch of salt: Balances the sweetness in the topping.
- Optional: 1/2 cup chopped pecans or walnuts: For added crunch and nutty flavor. These are excellent additions to any easy, homemade, pumpkin, crisp.
Step-by-Step Method for the Perfect easy, homemade, pumpkin, crisp
Step 1 — Prepare Your Pumpkin Puree (if making homemade)
If you’re using canned pumpkin puree, you can skip to Step 2. For homemade puree:
- Preheat oven to 400°F (200°C).
- Cut a small pie pumpkin (like a Sugar Pie pumpkin) in half, scoop out seeds and stringy bits.
- Place cut-side down on a baking sheet lined with parchment paper.
- Roast for 45-60 minutes, or until very tender when pierced with a fork.
- Let cool slightly, then scoop out the flesh and blend in a food processor until smooth. Drain any excess liquid if it seems watery. This step is vital for the intense flavor of your easy, homemade, pumpkin, crisp.
Step 2 — Prepare the Pumpkin Layer
- Preheat your oven to 350°F (175°C). Lightly grease or spray a 9×13 inch baking dish.
- In a large mixing bowl, combine the pumpkin puree, granulated sugar, brown sugar, evaporated milk, eggs, pumpkin pie spice, salt, and vanilla extract.
- Whisk thoroughly until all ingredients are well combined and the mixture is smooth and lump-free.
- Pour the pumpkin mixture evenly into the prepared baking dish.
This forms the delightful, creamy base of your easy, homemade, pumpkin, crisp, ready for its crunchy crown.
Step 3 — Prepare the Crisp Topping
- In a separate medium-sized bowl, combine the flour, rolled oats, brown sugar, and cinnamon. Add a pinch of salt.
- Add the cold, cubed butter to the dry ingredients. Using your fingertips, a pastry blender, or a fork, cut the butter into the flour mixture until it resembles coarse crumbs with some pea-sized pieces of butter remaining. The goal is to incorporate the butter without completely melting it.
- If using, stir in the chopped pecans or walnuts.
- Evenly sprinkle the crisp topping mixture over the pumpkin layer in the baking dish. Ensure good coverage for a consistent crunch in every bite of your easy, homemade, pumpkin, crisp.
Step 4 — Bake Your easy, homemade, pumpkin, crisp
- Place the baking dish in the preheated oven.
- Bake for 50-60 minutes, or until the pumpkin layer is set (a knife inserted into the center comes out mostly clean) and the crisp topping is golden brown and bubbly.
- If the topping starts to brown too quickly, you can loosely tent the dish with aluminum foil.
Step 5 — Cool and Serve
- Once baked, remove the easy, homemade, pumpkin, crisp from the oven.
- Let it cool on a wire rack for at least 20-30 minutes before serving. This allows the pumpkin layer to set further and makes for cleaner serving.
- Serve warm, perhaps with a dollop of whipped cream, a scoop of vanilla ice cream, or a drizzle of caramel sauce for an extra touch of indulgence.
Waiting for it to cool can be the hardest part, but it’s essential for achieving the perfect texture. The aroma alone will be a reward for your patience!
Nutrition Facts (estimated per serving, based on 10 servings)
Please note these are approximate values and can vary based on specific ingredient brands and preparation methods. This is an estimation for a richer easy, homemade, pumpkin, crisp.
- Calories: 380-420
- Protein: 7-9g
- Carbohydrates: 50-60g
- Fat: 18-22g (of which Saturated Fat: 10-12g)
- Fiber: 3-5g
- Sugars: 30-40g
- Sodium: 180-220mg
While this is a treat, it does offer beneficial nutrients like Vitamin A from the pumpkin, fiber from the oats, and some protein, making it a more wholesome dessert than many alternatives. It’s a fantastic way to incorporate seasonal goodness into your diet.
Healthy Variations for Your easy, homemade, pumpkin, crisp
Making an easy, homemade, pumpkin, crisp healthier doesn’t mean sacrificing flavor. Here are several ways to adapt the recipe without compromising on taste or texture:
- Reduced Sugar: Minimize added sugars by reducing the granulated and brown sugar by 1/4 to 1/2 cup in both the pumpkin layer and crisp topping. The natural sweetness of the pumpkin and spices can carry much of the flavor. You can also experiment with natural sweeteners like maple syrup or date sugar, adjusting liquid content if necessary.
- Whole Grains: Swap half or all of the all-purpose flour in the crisp topping for whole wheat flour or a whole wheat pastry flour. This boosts fiber content.
- Nutrient Boost:
- Add 1/4 cup of ground flaxseed or chia seeds to the crisp topping mixture for extra fiber and omega-3 fatty acids.
- Incorporate more nuts like almonds, walnuts, or pecans for healthy fats and protein.
- Stir in a spoonful of puréed sweet potato or butternut squash into the pumpkin layer for added vegetable richness and complexity.
- Dairy-Free/Vegan:
- Use full-fat coconut milk (canned) instead of evaporated milk for the pumpkin layer. This adds a subtle coconut flavor that pairs wonderfully with pumpkin.
- Replace butter with a good quality vegan butter substitute (stick form works best for crumblers).
- For eggs, use “flax eggs” (1 tbsp ground flaxseed + 3 tbsp water, let sit for 5 minutes per egg) or a commercial egg replacer, though this recipe, with the evaporated milk, might adapt better to simply skipping the eggs and letting the starch and coconut milk bind things.
- Gluten-Free:
- Use a 1:1 gluten-free all-purpose flour blend for the crisp topping. Ensure it contains xanthan gum or add 1/2 tsp per cup of flour.
- Make sure to use certified gluten-free rolled oats.
- Protein-Packed: While not typical for a crisp, you could experiment with a scoop of unflavored or vanilla protein powder mixed into the crisp topping’s dry ingredients for an extra boost.
These modifications ensure that your easy, homemade, pumpkin, crisp can be enjoyed by a wider audience, catering to various dietary needs and preferences while maintaining its delicious appeal. Explore these options to personalize your recipe and make it even more nourishing.
Serving Suggestions for Your easy, homemade, pumpkin, crisp
While an easy, homemade, pumpkin, crisp is fantastic on its own, pairing it with complementary items can elevate the experience to pure culinary delight. Here are some serving suggestions to make your crisp even more special:
- Classic Toppings:
- Vanilla Ice Cream: A scoop of good quality vanilla bean ice cream melting over the warm crisp is a timeless classic. The contrast of hot and cold, and the creamy sweetness, is simply divine.
- Whipped Cream: Freshly whipped cream, lightly sweetened with a touch of vanilla, adds a luxurious cloud-like texture and rich dairy note.
- Caramel Sauce: A drizzle of homemade or store-bought caramel sauce deepens the flavors and adds a touch of sticky sweetness.
- Unexpected Pairings:
- Crème Fraîche or Greek Yogurt: For a slightly tangy counterpoint, a dollop of crème fraîche or plain Greek yogurt can cut through the sweetness and add a sophisticated touch.
- Spiced Pecans or Candied Ginger: Sprinkle extra toasted, spiced pecans or finely chopped candied ginger on top for an added layer of texture and flavor complexity.
- Maple Syrup Drizzle: Instead of caramel, a pure maple syrup drizzle can enhance the autumnal notes of the pumpkin.
- Beverage Pairings:
- Coffee or Espresso: A strong cup of coffee or an espresso shot can be a wonderful companion, balancing the sweetness of the crisp.
- Chai Tea Latte: The warm spices in a chai latte beautifully echo the flavors in the pumpkin crisp.
- Hard Cider or Dessert Wine: For an adult pairing, consider a crisp hard apple cider or a sweet dessert wine like Moscato or Riesling.
- Meal Companions: While typically a dessert, a smaller portion of easy, homemade, pumpkin, crisp can also be a delightful breakfast or brunch item, especially if made with less sugar. Serve with a side of Garlic Herb Flatbread at a holiday meal, or for a lighter option, pair it with some Honey Oat Energy Bites for a balanced treat. If you’re planning a fall feast, consider serving this after a hearty Chicken & Vegetable Stew.
Experiment with these suggestions to find your favorite way to enjoy your easy, homemade, pumpkin, crisp and make it a truly memorable dish.
Common Mistakes to Avoid When Making easy, homemade, pumpkin, crisp
Even though an easy, homemade, pumpkin, crisp is relatively straightforward, a few common pitfalls can affect the outcome. Being aware of these can help you achieve perfection every time:
- Substituting Pumpkin Pie Filling for Puree: This is a frequent mistake. Pumpkin pie filling is pre-sweetened and spiced, and it often contains other ingredients that will throw off the flavor balance and consistency of your crisp. Always use 100% pure pumpkin puree.
- Using Warm Butter in the Topping: Cold butter is essential for a crumbly, crisp topping. If your butter is too warm, it will melt into the flour, creating a more dough-like or paste-like consistency rather than the desired streusel. Use butter straight from the fridge, and work quickly.
- Overmixing the Pumpkin Layer: While you want to ensure all ingredients are combined, overmixing can incorporate too much air, which can cause the pumpkin layer to puff up too much during baking and then deflate, resulting in a less dense texture. Mix just until smooth.
- Underbaking the Pumpkin Layer: An underbaked pumpkin layer will be too jiggly and won’t set properly, leading to a runny crisp. The center should be mostly set, with only a slight jiggle, and a knife inserted near the center should come out clean.
- Overcooking the Topping: While you want a golden-brown, crispy topping, overcooking can lead to a burnt or overly hard streusel. Keep an eye on it during the last 15-20 minutes of baking. If it’s browning too quickly, tent it loosely with foil.
- Skipping the Cooling Step: It’s tempting to dig in right away, but allowing the easy, homemade, pumpkin, crisp to cool for at least 20-30 minutes allows the pumpkin layer to fully set, making for cleaner slices and a better overall texture.
- Not Salting the Recipe: Salt is crucial for balancing sweetness and enhancing the other flavors in both the pumpkin filling and the crisp topping. Don’t omit it!
- Using Instant Oats: Instant oats are too finely processed and will absorb too much liquid, leading to a mushy topping rather than a distinct, chewy texture. Always opt for old-fashioned rolled oats.
By keeping these common mistakes in mind, you’ll be well on your way to baking a flawless easy, homemade, pumpkin, crisp that impresses every time.
Storage Tips and Reheating Your easy, homemade, pumpkin, crisp
Proper storage is essential for maintaining the quality and extending the life of your easy, homemade, pumpkin, crisp. Here’s how to store and reheat it:
- Cool Completely: Before storing, ensure your easy, homemade, pumpkin, crisp has cooled completely to room temperature. Storing it warm can create condensation, which makes the topping soggy and encourages bacterial growth.
- Refrigeration:
- Once cooled, cover the baking dish tightly with plastic wrap or aluminum foil, or transfer individual servings to airtight containers.
- Store in the refrigerator for up to 3-4 days. The topping may soften slightly over time, but the flavor will remain excellent.
- Freezing (for longer storage):
- An easy, homemade, pumpkin, crisp freezes beautifully! Once completely cooled, you can freeze it in the baking dish (well-wrapped) or portion it out.
- Whole Crisp: Wrap the entire baking dish tightly with several layers of plastic wrap, followed by a layer of aluminum foil.
- Individual Portions: Cut the crisp into individual servings. Wrap each piece tightly in plastic wrap, then place them in a freezer-safe bag or airtight container. This allows you to thaw only what you need.
- Freeze for up to 2-3 months. Beyond this, the quality may start to decline.
Reheating Instructions:
- From the Refrigerator:
- Oven (Recommended for best topping texture): Preheat your oven to 300°F (150°C). Place the portion(s) (covered loosely with foil if reheating a larger piece to prevent over-browning) on a baking sheet. Reheat for 15-25 minutes, or until warmed through. The foil helps prevent the topping from drying out or burning.
- Microwave (Quickest, but topping will be soft): For individual servings, microwave on medium power for 30-60 seconds, or until heated through. Be aware that the crisp topping will likely lose its crunch in the microwave.
- From the Freezer:
- Thaw First: For best results, it’s ideal to thaw the frozen crisp in the refrigerator overnight.
- Reheat in Oven: Once thawed, reheat following the refrigerator instructions (300°F (150°C) for 20-35 minutes, covered loosely with foil). This helps to restore some of the crispness to the topping.
- From Frozen (if in a hurry): You can reheat from frozen, but it will take longer. Place the frozen crisp (covered) in a 300°F (150°C) oven for 45-60 minutes, or until heated through. Remove foil for the last 10 minutes to crisp up the topping.
By following these storage and reheating tips, you can enjoy your delicious easy, homemade, pumpkin, crisp whenever a craving strikes, ensuring it retains its comforting flavors and textures.
The Versatility of Pumpkin – More Than Just a Crisp
While an easy, homemade, pumpkin, crisp is a sublime way to enjoy this seasonal squash, the versatility of pumpkin extends far beyond just desserts. Incorporating pumpkin into your diet offers a myriad of health benefits and culinary possibilities. Pumpkin is a nutritional powerhouse, rich in Vitamin A (beta-carotene), which is crucial for vision and immune function. It also provides Vitamin C, Vitamin E, iron, and potassium, alongside a good amount of dietary fiber, promoting digestive health and satiety.
Beyond the classic crisp, pumpkin shines in:
- Savory Dishes: Pumpkin can be roasted and added to salads, blended into creamy soups (Healthline highlights many benefits of nutrient-dense soups), incorporated into curries, or even used as a base for pasta sauces. Its subtle sweetness complements earthy spices and savory ingredients beautifully.
- Breakfast Items: Stir pumpkin puree into oatmeal, pancakes, waffles, or muffins for a nutritious and flavorful start to your day. Pumpkin bread and scones are also popular autumnal breakfast treats.
- Beverages: The ubiquitous pumpkin spice latte is just the beginning. Pumpkin smoothies, milkshakes, and even cocktails can feature this versatile ingredient, utilizing its creamy texture and sweet notes.
- Baked Goods: Beyond the crisp, pumpkin pie (a Thanksgiving staple), pumpkin bread, donuts, and cheesecakes are beloved for their rich flavor and moist texture. The Harvard Nutrition Source provides excellent resources on incorporating healthy ingredients like pumpkin into your diet, emphasizing plant-based eating (see Harvard Nutrition Source).
When cooking with pumpkin, remember that freshly roasted pumpkin typically offers a deeper, more robust flavor profile compared to canned puree. If using canned, always opt for 100% pure pumpkin puree, not pie filling, to maintain control over sweetness and seasoning. For more insights on the nutritional value of pumpkin and its role in a healthy diet, articles like those found on Medical News Today can offer valuable information, even if they focus on specific preparations like soups.
By exploring the diverse ways to use pumpkin, you not only enrich your culinary repertoire but also boost your intake of vital nutrients, making the most of this wonderful seasonal squash. So, after you’ve mastered your easy, homemade, pumpkin, crisp, don’t hesitate to venture into other delicious pumpkin-centric creations!
Conclusion
easy, homemade, pumpkin, crisp proves that healthy, seasonal food can be both rich in flavor and profoundly comforting. This detailed guide has provided you with everything you need to master this beloved dessert, from selecting the finest ingredients and executing each step with precision to understanding its nutritional value and exploring creative variations. Whether you’re aiming for a classic indulgence or a healthier adaptation, the principles of balancing sweet pumpkin with a buttery, crispy topping remain at the heart of this dish.
The act of preparing and sharing an easy, homemade, pumpkin, crisp is more than just cooking; it’s about creating memories, sharing joy, and savoring the simple pleasures of autumn and winter. Its inviting aroma, delightful textures, and warm, spiced flavors make it a perfect centerpiece for holiday gatherings, a cozy treat for a quiet evening, or a thoughtful gift for loved ones. With the knowledge gleaned from this 2100+ word comprehensive guide, you are now equipped to produce perfect results every time, bringing warmth and satisfaction with every spoonful. Embrace the season, gather your ingredients, and enjoy the delicious journey of making your own unforgettable pumpkin crisp.
FAQ About Your easy, homemade, pumpkin, crisp
- Can I use frozen pumpkin puree? Yes, if you’ve made and frozen your own homemade puree, it will work perfectly. Just ensure it’s completely thawed and any excess water is drained before using.
- How can I make the topping extra crunchy? For an even crunchier topping, increase the amount of rolled oats slightly, or add a tablespoon of coarse sugar (like turbinado sugar) before baking. Ensuring your butter is very cold and not overmixing also contributes to crispiness.
- What if my pumpkin layer seems too runny? This can happen if your pumpkin puree was too watery (especially homemade) or if you used an alternative milk that’s thinner than evaporated milk. Try reducing the milk by a tablespoon or two next time, or add a teaspoon of cornstarch mixed with a little cold milk to the pumpkin mixture before baking to help it set.
- Can I prepare this in advance? Yes, you can prepare the pumpkin layer and the crisp topping separately and store them in the refrigerator for up to 1-2 days. Assemble and bake just before serving for the freshest taste and best topping texture.
- Is this crisp suitable for breakfast? Absolutely! Especially if you reduce the sugar content, an easy, homemade, pumpkin, crisp can be a wonderful, wholesome breakfast or brunch item, perhaps served with Greek yogurt.
- What kind of baking dish is best? A 9×13 inch ceramic or glass baking dish works perfectly, distributing heat evenly and providing excellent presentation.
- What’s the difference between a crisp and a crumble? Often, the terms are used interchangeably. Traditionally, a crisp topping typically includes oats, which crisp up as they bake, while a crumble usually has a streusel-like topping made of flour, sugar, and butter often without oats. This recipe, featuring oats, leans towards a “crisp.”

passionate about high-protein, easy meal-prep recipes for busy lifestyles.